- 1. 배열의 생성
- 2. 배열 요소의 추가와 삭제
- 3. 배열의 순회
- 4. Array Property
- 5. Array Method
- 5.1 Array.isArray(arg: any): boolean ES5
- 5.2 Array.from ES6
- 5.3 Array.of ES6
- 5.4 Array.prototype.indexOf(searchElement: T, fromIndex?: number): number 🔒 ES5
- 5.5 Array.prototype.concat(…items: Array<T[] | T>): T[] 🔒 ES3
- 5.6 Array.prototype.join(separator?: string): string 🔒 ES1
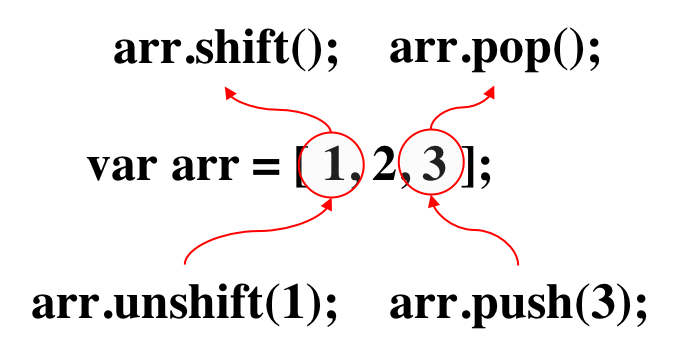
- 5.7 Array.prototype.push(…items: T[]): number ✏️ ES3
- 5.8 Array.prototype.pop(): T | undefined ✏️ ES3
- 5.9 Array.prototype.reverse(): this ✏️ ES1
- 5.10 Array.prototype.shift(): T | undefined ✏️ ES3
- 5.11 Array.prototype.slice(start=0, end=this.length): T[] 🔒 ES3
- 5.12 Array.prototype.splice(start: number, deleteCount=this.length-start, …items: T[]): T[] ✏️ ES3
- Reference
배열(array)은 1개의 변수에 여러 개의 값을 순차적으로 저장할 때 사용한다. 자바스크립트의 배열은 객체이며 유용한 내장 메소드를 포함하고 있다.
배열은 Array 생성자로 생성된 Array 타입의 객체이며 프로토타입 객체는 Array.prototype이다.
1. 배열의 생성
1.1 배열 리터럴
0개 이상의 값을 쉼표로 구분하여 대괄호([])로 묶는다. 첫번째 값은 인덱스 ‘0’으로 읽을 수 있다. 존재하지 않는 요소에 접근하면 undefined를 반환한다.
const emptyArr = [];

console.log(emptyArr[1]); // undefined
console.log(emptyArr.length); // 0

const arr = [
  'zero', 'one', 'two', 'three', 'four',
  'five', 'six', 'seven', 'eight', 'nine'
];

console.log(arr[1]);      // 'one'
console.log(arr.length);  // 10
console.log(typeof arr);  // object
위의 배열을 객체 리터럴로 유사하게 표현하면 다음과 같다.
const obj = {
  '0': 'zero',  '1': 'one',   '2': 'two',
  '3': 'three', '4': 'four',  '5': 'five',
  '6': 'six',   '7': 'seven', '8': 'eight',
  '9': 'nine'
};
배열 리터럴은 객체 리터럴과 달리 프로퍼티명이 없고 각 요소의 값만이 존재한다. 객체는 프로퍼티 값에 접근하기 위해 대괄호 표기법 또는 마침표 표기법을 사용하며 프로퍼티명을 키로 사용한다. 배열은 요소에 접근하기 위해 대괄호 표기법만을 사용하며 대괄호 내에 접근하고자 하는 요소의 인덱스를 넣어준다. 인덱스는 0부터 시작한다.
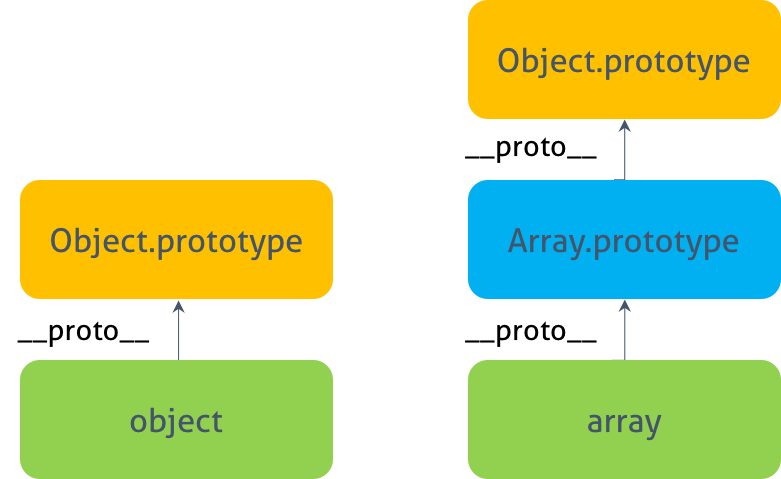
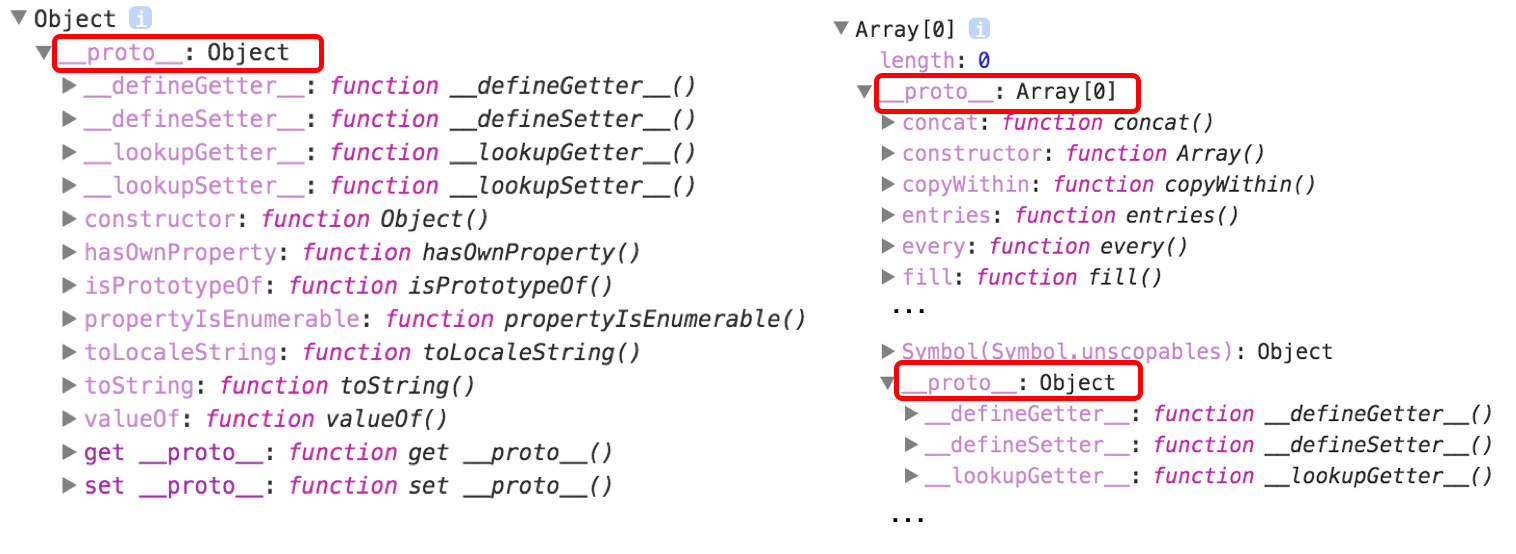
두 객체의 근본적 차이는 배열 리터럴 arr의 프로토타입 객체는 Array.prototype이지만 객체 리터럴 obj의 프로토타입 객체는 Object.prototype이라는 것이다.

객체리터럴과 배열리터럴의 프로토타입
const emptyArr = [];
const emptyObj = {};

console.dir(emptyArr.__proto__);
console.dir(emptyObj.__proto__);

대부분의 프로그래밍 언어에서 배열의 요소들은 모두 같은 데이터 타입이어야 하지만, 자바스크립트 배열은 어떤 데이터 타입의 조합이라도 포함할 수 있다.
const misc = [
  'string',
  10,
  true,
  null,
  undefined,
  NaN,
  Infinity,
  ['nested array'],
  { object: true },
  function () {}
];

console.log(misc.length); // 10
1.2 Array() 생성자 함수
배열은 일반적으로 배열 리터럴 방식으로 생성하지만 배열 리터럴 방식도 결국 내장 함수 Array() 생성자 함수로 배열을 생성하는 것을 단순화시킨 것이다. Array() 생성자 함수는 Array.prototype.constructor 프로퍼티로 접근할 수 있다.
Array() 생성자 함수는 매개변수의 갯수에 따라 다르게 동작한다.
매개변수가 1개이고 숫자인 경우 매개변수로 전달된 숫자를 length 값으로 가지는 빈 배열을 생성한다.
const arr = new Array(2);
console.log(arr); // (2) [empty × 2]
그 외의 경우 매개변수로 전달된 값들을 요소로 가지는 배열을 생성한다.
const arr = new Array(1, 2, 3);
console.log(arr); // [1, 2, 3]
2. 배열 요소의 추가와 삭제
2.1 배열 요소의 추가
객체가 동적으로 프로퍼티를 추가할 수 있는 것처럼 배열도 동적으로 요소를 추가할 수 있다. 이때 순서에 맞게 값을 할당할 필요는 없고 인덱스를 사용하여 필요한 위치에 값을 할당한다. 배열의 길이(length)는 마지막 인덱스를 기준으로 산정된다.
const arr = [];
console.log(arr[0]); // undefined

arr[1] = 1;
arr[3] = 3;

console.log(arr); // (4) [empty, 1, empty, 3]
console.log(arr.lenth); // 4
값이 할당되지 않은 인덱스 위치의 요소는 생성되지 않는다는 것에 주의하자. 단, 존재하지 않는 요소를 참조하면 undefined가 반환된다.
// 값이 할당되지 않은 인덱스 위치의 요소는 생성되지 않는다.
console.log(Object.keys(arr)); // [ '1', '3' ]

// arr[0]이 undefined를 반환한 이유는 존재하지 않는 프로퍼티에 접근했을 때 undefined를 반환하는 것과 같은 이치다.
console.log(arr[0]); // undefined
2.2 배열 요소의 삭제
배열은 객체이기 때문에 배열의 요소를 삭제하기 위해 delete 연산자를 사용할 수 있다. 이때 length에는 변함이 없다. 해당 요소를 완전히 삭제하여 length에도 반영되게 하기 위해서는 Array.prototype.splice 메소드를 사용한다.
const numbersArr = ['zero', 'one', 'two', 'three'];

// 요소의 값만 삭제된다
delete numbersArr[2]; // (4) ["zero", "one", empty, "three"]
console.log(numbersArr);

// 요소 값만이 아니라 요소를 완전히 삭제한다
// splice(시작 인덱스, 삭제할 요소수)
numbersArr.splice(2, 1); // (3) ["zero", "one", "three"]
console.log(numbersArr);
3. 배열의 순회
객체의 프로퍼티를 순회할 때 for…in 문을 사용한다. 배열 역시 객체이므로 for…in 문을 사용할 수 있다. 그러나 배열은 객체이기 때문에 프로퍼티를 가질 수 있다. for…in 문을 사용하면 배열 요소뿐만 아니라 불필요한 프로퍼티까지 출력될 수 있고 요소들의 순서를 보장하지 않으므로 배열을 순회하는데 적합하지 않다.
따라서 배열의 순회에는 forEach 메소드, for 문, for…of 문을 사용하는 것이 좋다.
const arr = [0, 1, 2, 3];
arr.foo = 10;

for (const key in arr) {
  console.log('key: ' + key, 'value: ' + arr[key]);
}
// key: 0 value: 0
// key: 1 value: 1
// key: 2 value: 2
// key: 3 value: 3
// key: foo value: 10 => 불필요한 프로퍼티까지 출력

arr.forEach((item, index) => console.log(index, item));

for (let i = 0; i < arr.length; i++) {
  console.log(i, arr[i]);
}

for (const item of arr) {
  console.log(item);
}
4. Array Property
4.1 Array.length
length 프로퍼티는 요소의 개수(배열의 길이)를 나타낸다. 배열 인덱스는 32bit 양의 정수로 처리된다. 따라서 length 프로퍼티의 값은 양의 정수이며 232 - 1(4,294,967,296 - 1) 미만이다.
const arr = [1, 2, 3, 4, 5];
console.log(arr.length); // 5

arr[4294967294] = 100;
console.log(arr.length); // 4294967295
console.log(arr); // (4294967295) [1, 2, 3, 4, 5, empty × 4294967289, 100]

arr[4294967295] = 1000;
console.log(arr.length); // 4294967295
console.log(arr); // (4294967295) [1, 2, 3, 4, 5, empty × 4294967289, 100, 4294967295: 1000]
주의할 것은 배열 요소의 개수와 length 프로퍼티의 값이 반드시 일치하지는 않는다는 것이다.
배열 요소의 개수와 length 프로퍼티의 값이 일치하지 않는 배열을 희소 배열(sparse array)이라 한다. 희소 배열은 배열의 요소가 연속적이지 않은 배열을 의미한다. 희소 배열이 아닌 일반 배열은 배열의 요소 개수와 length 프로퍼티의 값이 언제나 일치하지만 희소 배열은 배열의 요소 개수보다 length 프로퍼티의 값이 언제나 크다. 희소 배열은 일반 배열보다 느리며 메모리를 낭비한다.
현재 length 프로퍼티 값보다 더 큰 인덱스로 요소를 추가하면 새로운 요소를 추가할 수 있도록 자동으로 length 프로퍼티의 값이 늘어난다. length 프로퍼티의 값은 가장 큰 인덱스에 1을 더한 것과 같다.
const arr = [];
console.log(arr.length); // 0

arr[1000] = true;

console.log(arr);        // (1001) [empty × 1000, true]
console.log(arr.length); // 1001
console.log(arr[0]);     // undefined
length 프로퍼티의 값은 명시적으로 변경할 수 있다. 만약 length 프로퍼티의 값을 현재보다 작게 변경하면 변경된 length 프로퍼티의 값보다 크거나 같은 인덱스에 해당하는 요소는 모두 삭제된다.
const arr = [ 1, 2, 3, 4, 5 ];

// 배열 길이의 명시적 변경
arr.length = 3;
console.log(arr); // (3) [1, 2, 3]
5. Array Method
- ✏️ 메소드는
this(원본 배열)를 변경한다. - 🔒 메소드는
this(원본 배열)를 변경하지 않는다.
Array 객체가 제공하는 유용한 고차 함수에 대해서는 배열 고차 함수에서 살펴보도록 하자.
5.1 Array.isArray(arg: any): boolean ES5
정적 메소드 Array.isArray는 주어진 인수가 배열이면 true, 배열이 아니면 false를 반환한다.
// true
Array.isArray([]);
Array.isArray([1, 2]);
Array.isArray(new Array());

// false
Array.isArray();
Array.isArray({});
Array.isArray(null);
Array.isArray(undefined);
Array.isArray(1);
Array.isArray('Array');
Array.isArray(true);
Array.isArray(false);
5.2 Array.from ES6
ES6에서 새롭게 도입된 Array.from 메소드는 유사 배열 객체(array-like object) 또는 이터러블 객체(iterable object)를 변환하여 새로운 배열을 생성한다.
// 문자열은 이터러블이다.
const arr1 = Array.from('Hello');
console.log(arr1); // [ 'H', 'e', 'l', 'l', 'o' ]

// 유사 배열 객체를 새로운 배열을 변환하여 반환한다.
const arr2 = Array.from({ length: 2, 0: 'a', 1: 'b' });
console.log(arr2); // [ 'a', 'b' ]

// Array.from의 두번째 매개변수에게 배열의 모든 요소에 대해 호출할 함수를 전달할 수 있다.
// 이 함수는 첫번째 매개변수에게 전달된 인수로 생성된 배열의 모든 요소를 인수로 전달받아 호출된다.
const arr3 = Array.from({ length: 5 }, function (v, i) { return i; });
console.log(arr3); // [ 0, 1, 2, 3, 4 ]
5.3 Array.of ES6
ES6에서 새롭게 도입된 Array.of 메소드는 전달된 인수를 요소로 갖는 배열을 생성한다.
Array.of는 Array 생성자 함수와 다르게 전달된 인수가 1개이고 숫자이더라도 인수를 요소로 갖는 배열을 생성한다.
// 전달된 인수가 1개이고 숫자이더라도 인수를 요소로 갖는 배열을 생성한다.
const arr1 = Array.of(1);
console.log(arr1); // // [1]

const arr2 = Array.of(1, 2, 3);
console.log(arr2); // [1, 2, 3]

const arr3 = Array.of('string');
console.log(arr3); // 'string'
5.4 Array.prototype.indexOf(searchElement: T, fromIndex?: number): number 🔒 ES5
원본 배열에서 인수로 전달된 요소를 검색하여 인덱스를 반환한다.
- 중복되는 요소가 있는 경우, 첫번째 인덱스를 반환한다.
- 해당하는 요소가 없는 경우, -1을 반환한다.
const arr = [1, 2, 2, 3];

// 배열 arr에서 요소 2를 검색하여 첫번째 인덱스를 반환
arr.indexOf(2);    // -> 1
// 배열 arr에서 요소 4가 없으므로 -1을 반환
arr.indexOf(4);    // -1
// 두번째 인수는 검색을 시작할 인덱스이다. 두번째 인수를 생략하면 처음부터 검색한다.
arr.indexOf(2, 2); // 2
indexOf 메소드는 배열에 요소가 존재하는지 여부를 확인할 때 유용하다.
const foods = ['apple', 'banana', 'orange'];

// foods 배열에 'orange' 요소가 존재하는지 확인
if (foods.indexOf('orange') === -1) {
  // foods 배열에 'orange' 요소가 존재하지 않으면 'orange' 요소를 추가
  foods.push('orange');
}

console.log(foods); // ["apple", "banana", "orange"]
ES7에서 새롭게 도입된 Array.prototype.includes 메소드를 사용하면 보다 가독성이 좋다.
const foods = ['apple', 'banana'];

// ES7: Array.prototype.includes
// foods 배열에 'orange' 요소가 존재하는지 확인
if (!foods.includes('orange')) {
  // foods 배열에 'orange' 요소가 존재하지 않으면 'orange' 요소를 추가
  foods.push('orange');
}

console.log(foods); // ["apple", "banana", "orange"]
5.5 Array.prototype.concat(…items: Array<T[] | T>): T[] 🔒 ES3
인수로 전달된 값들(배열 또는 값)을 원본 배열의 마지막 요소로 추가한 새로운 배열을 반환한다. 인수로 전달한 값이 배열인 경우, 배열을 해체하여 새로운 배열의 요소로 추가한다. 원본 배열은 변경되지 않는다.
const arr1 = [1, 2];
const arr2 = [3, 4];

// 배열 arr2를 원본 배열 arr1의 마지막 요소로 추가한 새로운 배열을 반환
// 인수로 전달한 값이 배열인 경우, 배열을 해체하여 새로운 배열의 요소로 추가한다.
let result = arr1.concat(arr2);
console.log(result); // [1, 2, 3, 4]

// 숫자를 원본 배열 arr1의 마지막 요소로 추가한 새로운 배열을 반환
result = arr1.concat(3);
console.log(result); // ["1, 2, 3]

//  배열 arr2와 숫자를 원본 배열 arr1의 마지막 요소로 추가한 새로운 배열을 반환
result = arr1.concat(arr2, 5);
console.log(result); // [1, 2, 3, 4, 5]

// 원본 배열은 변경되지 않는다.
console.log(arr1); // [1, 2]
5.6 Array.prototype.join(separator?: string): string 🔒 ES1
원본 배열의 모든 요소를 문자열로 변환한 후, 인수로 전달받은 값, 즉 구분자(separator)로 연결한 문자열을 반환한다. 구분자(separator)는 생략 가능하며 기본 구분자는 ,이다.
const arr = [1, 2, 3, 4];

// 기본 구분자는 ','이다.
// 원본 배열 arr의 모든 요소를 문자열로 변환한 후, 기본 구분자 ','로 연결한 문자열을 반환
let result = arr.join();
console.log(result); // '1,2,3,4';

// 원본 배열 arr의 모든 요소를 문자열로 변환한 후, 빈문자열로 연결한 문자열을 반환
result = arr.join('');
console.log(result); // '1234'

// 원본 배열 arr의 모든 요소를 문자열로 변환한 후, 구분자 ':'로 연결한 문자열을 반환
result = arr.join(':');
console.log(result); // '1:2:3:4'
5.7 Array.prototype.push(…items: T[]): number ✏️ ES3
인수로 전달받은 모든 값을 원본 배열의 마지막에 요소로 추가하고 변경된 length 값을 반환한다. push 메소드는 원본 배열을 직접 변경한다.
const arr = [1, 2];

// 인수로 전달받은 모든 값을 원본 배열의 마지막에 요소로 추가하고 변경된 length 값을 반환한다.
let result = arr.push(3, 4);
console.log(result); // 4

// push 메소드는 원본 배열을 직접 변경한다.
console.log(arr); // [1, 2, 3, 4]
push 메소드와 concat 메소드는 유사하게 동작하지만 미묘한 차이가 있다.
- push 메소드는 원본 배열을 직접 변경하지만 concat 메소드는 원본 배열을 변경하지 않고 새로운 배열을 반환한다.
const arr1 = [1, 2];
// push 메소드는 원본 배열을 직접 변경한다.
arr1.push(3, 4);
console.log(arr1); // [1, 2, 3, 4]

const arr2 = [1, 2];
// concat 메소드는 원본 배열을 변경하지 않고 새로운 배열을 반환한다.
const result = arr2.concat(3, 4);
console.log(result); // [1, 2, 3, 4]
- 인수로 전달받은 값이 배열인 경우, push 메소드는 배열을 그대로 원본 배열의 마지막 요소로 추가하지만 concat 메소드는 배열을 해체하여 새로운 배열의 마지막 요소로 추가한다.
const arr1 = [1, 2];
// 인수로 전달받은 배열을 그대로 원본 배열의 마지막 요소로 추가한다
arr1.push([3, 4]);
console.log(arr1); // [1, 2, [3, 4]]

const arr2 = [1, 2];
// 인수로 전달받은 배열을 해체하여 새로운 배열의 마지막 요소로 추가한다
const result = arr2.concat([3, 4]);
console.log(result); // [1, 2, 3, 4]
push 메소드는 성능면에서 좋지 않다. push 메소드는 배열의 마지막에 요소를 추가하므로 length 프로퍼티를 사용하여 직접 요소를 추가할 수도 있다. 이 방법이 push 메소드보다 빠르다.
const arr = [1, 2];

// arr.push(3)와 동일한 처리를 한다. 이 방법이 push 메소드보다 빠르다.
arr[arr.length] = 3;

console.log(arr); // [1, 2, 3]
push 메소드는 원본 배열을 직접 변경하는 부수 효과가 있다. 따라서 push 메소드보다는 ES6의 spread 문법을 사용하는 편이 좋다. spread 문법은 나중에 살펴볼 것이다.
const arr = [1, 2];

// ES6 spread 문법
const newArr = [...arr, 3];
// arr.push(3);

console.log(newArr); // [1, 2, 3]
5.8 Array.prototype.pop(): T | undefined ✏️ ES3
원본 배열에서 마지막 요소를 제거하고 제거한 요소를 반환한다. 원본 배열이 빈 배열이면 undefined를 반환한다. pop 메소드는 원본 배열을 직접 변경한다.
const arr = [1, 2];

// 원본 배열에서 마지막 요소를 제거하고 제거한 요소를 반환한다.
let result = arr.pop();
console.log(result); // 2

// pop 메소드는 원본 배열을 직접 변경한다.
console.log(arr); // [1]
pop 메소드와 push 메소드를 사용하면 스택을 쉽게 구현할 수 있다.
스택(stack)은 데이터를 마지막에 밀어 넣고, 마지막에 밀어 넣은 데이터를 먼저 꺼내는 후입 선출(LIFO - Last In First Out) 방식의 자료 구조이다. 스택은 언제나 가장 마지막에 밀어 넣은 최신 데이터를 취득한다. 스택에 데이터를 밀어 넣는 것을 푸시(push)라 하고 스택에서 데이터를 꺼내는 것을 팝(pop)이라고 한다.
// 스택 자료 구조를 구현하기 위한 배열
const stack = [];

// 스택의 가장 마지막에 데이터를 밀어 넣는다.
stack.push(1);
console.log(stack); // [1]

// 스택의 가장 마지막에 데이터를 밀어 넣는다.
stack.push(2);
console.log(stack); // [1, 2]

// 스택의 가장 마지막 데이터, 즉 가장 나중에 밀어 넣은 최신 데이터를 꺼낸다.
let value = stack.pop();
console.log(value, stack); // 2 [1]

// 스택의 가장 마지막 데이터, 즉 가장 나중에 밀어 넣은 최신 데이터를 꺼낸다.
value = stack.pop();
console.log(value, stack); // 1 []
5.9 Array.prototype.reverse(): this ✏️ ES1
배열 요소의 순서를 반대로 변경한다. 이때 원본 배열이 변경된다. 반환값은 변경된 배열이다.
const a = ['a', 'b', 'c'];
const b = a.reverse();

// 원본 배열이 변경된다
console.log(a); // [ 'c', 'b', 'a' ]
console.log(b); // [ 'c', 'b', 'a' ]
5.10 Array.prototype.shift(): T | undefined ✏️ ES3
배열에서 첫요소를 제거하고 제거한 요소를 반환한다. 만약 빈 배열일 경우 undefined를 반환한다. shift 메소드는 대상 배열 자체를 변경한다.
const a = ['a', 'b', 'c'];
const c = a.shift();

// 원본 배열이 변경된다.
console.log(a); // a --> [ 'b', 'c' ]
console.log(c); // c --> 'a'
shift는 push와 함께 배열을 큐(FIFO: First In First Out)처럼 동작하게 한다.
const arr = [];

arr.push(1); // [1]
arr.push(2); // [1, 2]
arr.push(3); // [1, 2, 3]

arr.shift(); // [2, 3]
arr.shift(); // [3]
arr.shift(); // []
Array.prototype.pop()은 마지막 요소를 제거하고 제거한 요소를 반환한다.
const a = ['a', 'b', 'c'];
const c = a.pop();

// 원본 배열이 변경된다.
console.log(a); // a --> ['a', 'b']
console.log(c); // c --> 'c'

5.11 Array.prototype.slice(start=0, end=this.length): T[] 🔒 ES3
인자로 지정된 배열의 부분을 복사하여 반환한다. 원본 배열은 변경되지 않는다.
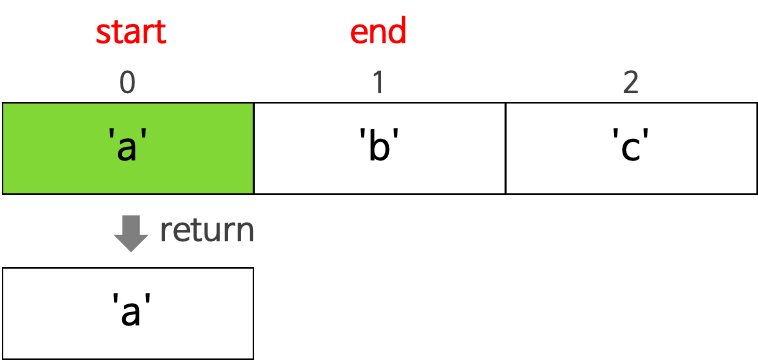
첫번째 매개변수 start에 해당하는 인덱스를 갖는 요소부터 매개변수 end에 해당하는 인덱스를 가진 요소 전까지 복사된다.
- 매개변수
- start
- 복사를 시작할 인텍스. 음수인 경우 배열의 끝에서의 인덱스를 나타낸다. 예를 들어 slice(-2)는 배열의 마지막 2개의 요소를 반환한다.
- end
- 옵션이며 기본값은 length 값이다.
const items = ['a', 'b', 'c'];

// items[0]부터 items[1] 이전(items[1] 미포함)까지 반환
let res = items.slice(0, 1);
console.log(res);  // [ 'a' ]

// items[1]부터 items[2] 이전(items[2] 미포함)까지 반환
res = items.slice(1, 2);
console.log(res);  // [ 'b' ]

// items[1]부터 이후의 모든 요소 반환
res = items.slice(1);
console.log(res);  // [ 'b', 'c' ]

// 인자가 음수인 경우 배열의 끝에서 요소를 반환
res = items.slice(-1);
console.log(res);  // [ 'c' ]

res = items.slice(-2);
console.log(res);  // [ 'b', 'c' ]

// 모든 요소를 반환 (= 복사본(shallow copy) 생성)
res = items.slice();
console.log(res);  // [ 'a', 'b', 'c' ]

// 원본은 변경되지 않는다.
console.log(items); // [ 'a', 'b', 'c' ]

Array.prototype.slice 메소드
slice 메소드에 인자를 전달하지 않으면 원본 배열의 복사본을 생성하여 반환한다.
const arr = [1, 2, 3];

// 원본 배열 arr의 새로운 복사본을 생성한다.
const copy = arr.slice();
console.log(copy, copy === arr); // [ 1, 2, 3 ] false
이때 원본 배열의 각 요소를 얕은 복사(shallow copy)하여 새로운 복사본을 생성한다.
const todos = [
  { id: 1, content: 'HTML', completed: false },
  { id: 2, content: 'CSS', completed: true },
  { id: 3, content: 'Javascript', completed: false }
];

// shallow copy
const _todos = todos.slice();
// const _todos = [...todos];
console.log(_todos === todos); // false

// 배열의 요소는 같다. 즉, 얕은 복사되었다.
console.log(_todos[0] === todos[0]); // true
Spread 문법과 Object.assign는 원본을 shallow copy한다. Deep copy를 위해서는 lodash의 deepClone을 사용하는 것을 추천한다.
이를 이용하여 arguments, HTMLCollection, NodeList와 같은 유사 배열 객체(Array-like Object)를 배열로 변환할 수 있다.
function sum() {
  // 유사 배열 객체 => Array
  const arr = Array.prototype.slice.call(arguments);
  console.log(arr); // [1, 2, 3]

  return arr.reduce(function (pre, cur) {
    return pre + cur;
  });
}

console.log(sum(1, 2, 3));
ES6에서 유사 배열 객체를 배열로 변환하는 방법은 아래와 같다.
// 유사 배열 객체 => Array
function sum() {
  ...
  // Spread 문법
  const arr = [...arguments];
  // Array.from 메소드는 유사 배열 객체를 복사하여 배열을 생성한다.
  const arr = Array.from(arguments);
  ...
}
5.12 Array.prototype.splice(start: number, deleteCount=this.length-start, …items: T[]): T[] ✏️ ES3
기존의 배열의 요소를 제거하고 그 위치에 새로운 요소를 추가한다. 배열 중간에 새로운 요소를 추가할 때도 사용된다.
- 매개변수
- start
- 배열에서의 시작 위치이다. start 만을 지정하면 배열의 start부터 모든 요소를 제거한다.
- deleteCount
- 시작 위치(start)부터 제거할 요소의 수이다. deleteCount가 0인 경우, 아무런 요소도 제거되지 않는다. (옵션)
- items
- 삭제한 위치에 추가될 요소들이다. 만약 아무런 요소도 지정하지 않을 경우, 삭제만 한다. (옵션)
- 반환값 삭제한 요소들을 가진 배열이다.
이 메소드의 가장 일반적인 사용은 배열에서 요소를 삭제할 때다.
const items1 = [1, 2, 3, 4];

// items[1]부터 2개의 요소를 제거하고 제거된 요소를 배열로 반환
const res1 = items1.splice(1, 2);

// 원본 배열이 변경된다.
console.log(items1); // [ 1, 4 ]
// 제거한 요소가 배열로 반환된다.
console.log(res1);   // [ 2, 3 ]

const items2 = [1, 2, 3, 4];

// items[1]부터 모든 요소를 제거하고 제거된 요소를 배열로 반환
const res2 = items2.splice(1);

// 원본 배열이 변경된다.
console.log(items2); // [ 1 ]
// 제거한 요소가 배열로 반환된다.
console.log(res2);   // [ 2, 3, 4 ]
 Array.prototype.splice 메소드
배열에서 요소를 제거하고 제거한 위치에 다른 요소를 추가한다.
const items = [1, 2, 3, 4];

// items[1]부터 2개의 요소를 제거하고 그자리에 새로운 요소를 추가한다. 제거된 요소가 반환된다.
const res = items.splice(1, 2, 20, 30);

// 원본 배열이 변경된다.
console.log(items); // [ 1, 20, 30, 4 ]
// 제거한 요소가 배열로 반환된다.
console.log(res);   // [ 2, 3 ]
 Array.prototype.splice 메소드
배열 중간에 새로운 요소를 추가할 때도 사용된다.
const items = [1, 2, 3, 4];

// items[1]부터 0개의 요소를 제거하고 그자리(items[1])에 새로운 요소를 추가한다. 제거된 요소가 반환된다.
const res = items.splice(1, 0, 100);

// 원본 배열이 변경된다.
console.log(items); // [ 1, 100, 2, 3, 4 ]
// 제거한 요소가 배열로 반환된다.
console.log(res);   // [ ]
배열 중간에 배열의 요소들을 해체하여 추가할 때도 사용된다.
const items = [1, 4];

// items[1]부터 0개의 요소를 제거하고 그자리(items[1])에 새로운 배열를 추가한다. 제거된 요소가 반환된다.
// items.splice(1, 0, [2, 3]); // [ 1, [ 2, 3 ], 4 ]
Array.prototype.splice.apply(items, [1, 0].concat([2, 3]));
// ES6
// items.splice(1, 0, ...[2, 3]);

console.log(items); // [ 1, 2, 3, 4 ]
slice는 배열의 일부분을 복사해서 반환하며 원본을 훼손하지 않는다. splice는 배열에서 요소를 제거하고 제거한 위치에 다른 요소를 추가하며 원본을 훼손한다.
