
Express는 Node.js 환경에서 동작하는 웹 애플리케이션 프레임워크이다. Express는 웹 애플리케이션 구성에 필요한 Routing, View Helper, Session(영속적 Session관리를 위해서는 Redis등의 Data store가 필요하다)등의 기능을 제공한다.
Express 4.16.4 버전을 기준으로 한다.
1. Express 설치
Node.js가 install되어 있음을 전제로 한다.
프로젝트 폴더를 생성하고 npm init로 package.json을 생성한 후 express install을 실시한다.
$ mkdir myapp && cd myapp
$ npm init -y
$ npm install express
2. Hello world 만들기
프로젝트 폴더(myapp)에 아래와 같이 app.js를 생성한다.
const express = require('express');
const app = express();

app.get('/', (req, res) => res.send('Hello World!'));

app.listen(3000, () => console.log('Example app listening on port 3000!'));
터미널에서 다음 명령을 실행하여 애플리케이션을 구동시킨다.
$ node app.js
Example app listening on port 3000!
서버는 port 3000에서 사용자의 접속을 대기하고 있다. 클라이언트가 GET 방식으로 루트 URL(http://localhost:3000/)에 요청을 보내면 서버는 ‘Hello World!’로 응답할 것이다.
3. Routing
클라이언트는 서버에 URI 및 특정한 HTTP 요청 메소드(GET, POST 등)로 요청을 전달한다.
// client-side ajax request
document.querySelector('button').addEventListener('click', function () {
  const xhr = new XMLHttpRequest();
  xhr.open('POST', '/signin');

  const username = document.querySelector('input[name=username]').value;
  const password = document.querySelector('input[name=password]').value;

  const payload = { username, password };

  xhr.setRequestHeader('Content-type', 'application/json');
  xhr.send(JSON.stringify(payload));

  xhr.onreadystatechange = function () {
    if (xhr.readyState !== XMLHttpRequest.DONE) return;

    if (xhr.status === 200) {
      console.log(xhr.response)
      document.querySelector('.result').innerHTML = xhr.response;
    } else {
      console.log("Error!");
    }
  };
});
이러한 클라이언트 요청에 응답하는 방법을 결정하는 것을 라우팅이라 한다. 각 라우트는 하나 이상의 핸들러 함수를 가질 수 있으며, 이러한 함수는 라우트가 일치할 때 실행된다.
라우트 정의에는 다음과 같은 구조가 필요하다.

위의 클라이언트 요청에 대응하는 route를 설정해보자.
먼저 request body parsing 미들웨어인 body-parser를 설치한다. body-parser 미들웨어는 페이로드(POST 요청 데이터와 같이 Request message의 body에 담겨 보내진 데이터)를 request 객체의 body 프로퍼티에 바인딩한다.
$ npm install body-parser
설치가 되었으면 아래와 같이 app.js를 수정한다.
// Server-side: app.js
const express = require('express');
const bodyParser = require('body-parser');
const app = express();
// parse application/x-www-form-urlencoded
// { extended: true } : nested object를 지원한다.
// https://stackoverflow.com/questions/29960764/what-does-extended-mean-in-express-4-0
app.use(bodyParser.urlencoded({ extended: true }));
// parse application/json
app.use(bodyParser.json());
app.get('/', (req, res) => res.send('Hello World!'));
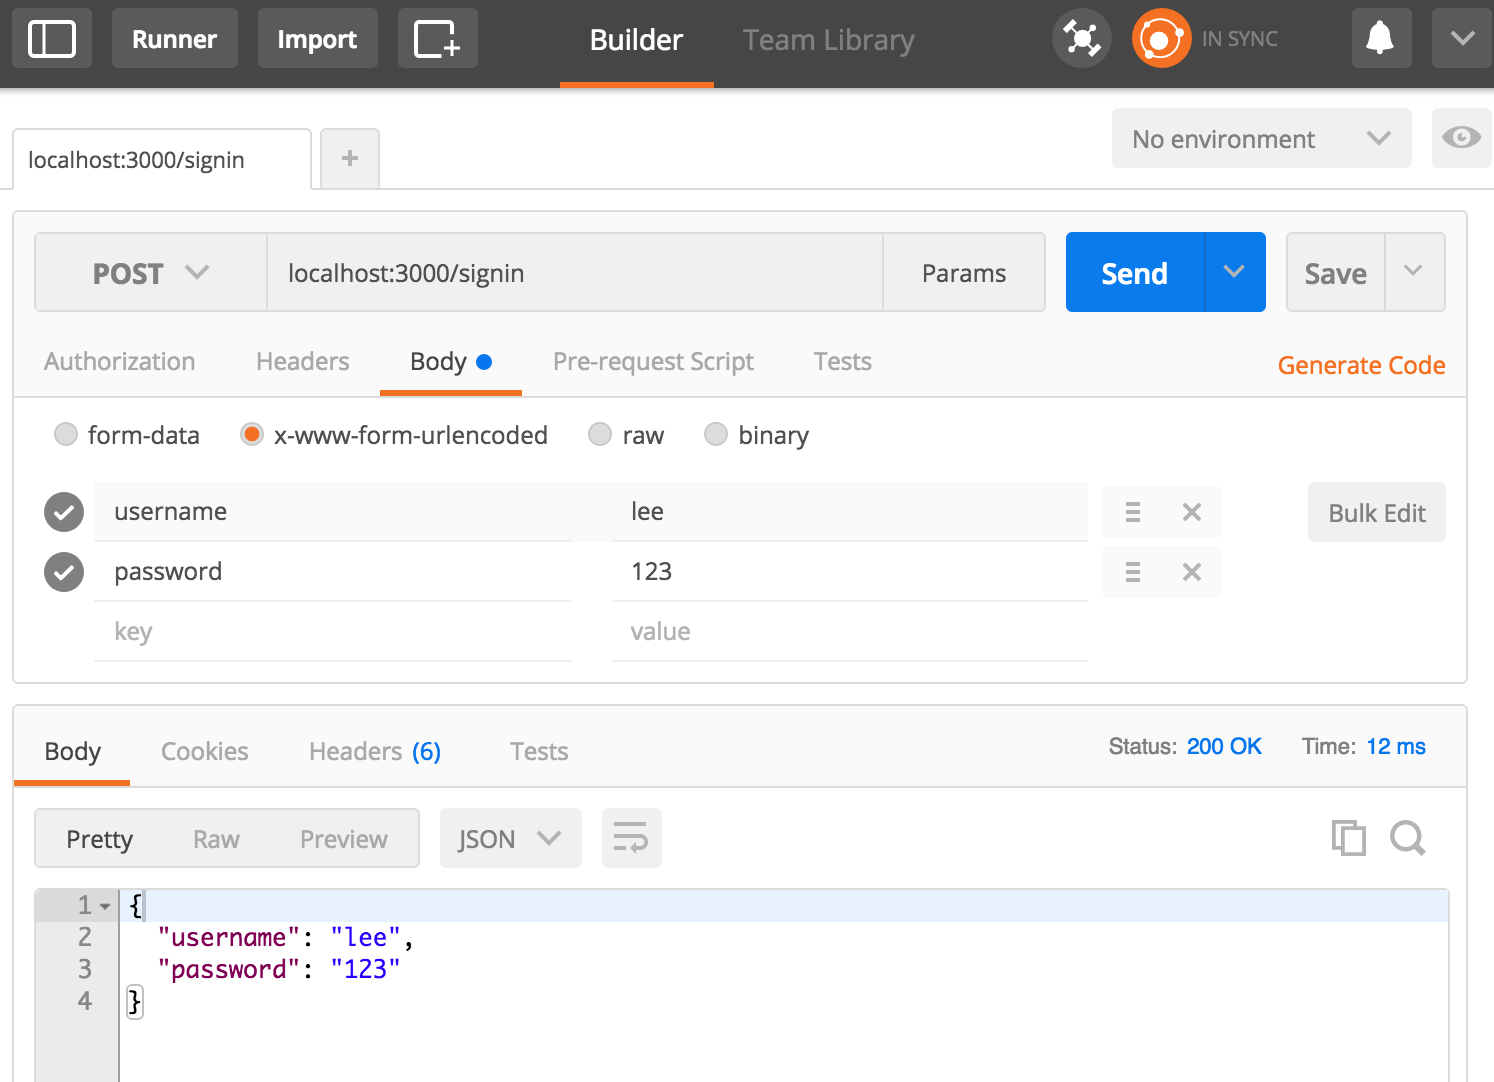
app.post('/signin', (req, res) => {
const { username, password } = req.body;
// 클라이언트로부터 전송된 페이로드를 그대로 response한다.
res.send({ username, password });
});
app.listen(3000, () => console.log('Example app listening on port 3000!'));
3.1 Route method
Express는 HTTP 메소드에 해당하는 다음과 같은 라우팅 메소드를 지원한다.
get, post, put, head, delete, options, trace, copy,
lock, mkcol, move, purge, propfind, proppatch, unlock,
report, mkactivity, checkout, merge, m-search, notify,
subscribe, unsubscribe, patch, search, connect.
// GET method route
app.get('/api/books', (req, res) => res.send('GET request to the /api/books'));

// POST method route
app.post('/api/books', (req, res) => res.send('POST request to the /api/books'));
app.all() 메소드는 모든 HTTP method에 대응한다. next()를 사용하면 후속 route handler로 제어를 전달할 수 있다.
// 모든 요청 메소드에 대응
app.all('/', (req, res, next) => {
  console.log('[All]');
  next(); // 후속 핸들러에게 컨트롤을 패스한다.
});

app.get('/', (req, res, next) => {
  console.log('[GET 1] next 함수에 의해 후속 핸들러에게 response가 전달된다.');
  next();
}, (req, res, next) => {
  console.log('[GET 2] next 함수에 의해 후속 핸들러에게 response가 전달된다.');
  next();
}, (req, res) => res.send('Hello from GET /'));

app.post('/', (req, res, next) => {
  console.log('[POST 1] next 함수에 의해 후속 핸들러에게 response가 전달된다.');
  next();
}, (req, res, next) => {
  console.log('[POST 2] next 함수에 의해 후속 핸들러에게 response가 전달된다.');
  next();
}, (req, res) => res.send('Hello from POST /'));
3.2 Route path
Route path에는 문자열 또는 정규표현식을 사용할 수 있다.
// localhost:3000/
app.get('/', (req, res) => res.send('root'));

// localhost:3000/about
app.get('/about', (req, res) => res.send('about'));

// localhost:3000//random.text
app.get('/random.text', (req, res) => res.send('random.text'));

// localhost:3000/<number>
app.get(/^\/[0-9]+$/, (req, res) => res.send('regexp'));

// localhost:3000/user/<userId>/item/<itemId>
app.get('/user/:userId/item/:itemId', (req, res) => {
  const { userId, itemId } = req.params;
  res.send(`userId: ${userId}, itemId: ${itemId}`);
});
3.3 Route handler
Route handler는 요청을 처리하는 콜백함수이다.
app.get('/example/a', (req, res) => res.send('Hello from A!'));
next()를 사용하면 후속 route handler로 제어를 전달할 수 있다.
app.get('/example/b', (req, res, next) => {
  console.log('the response will be sent by the next function ...');
  next();
}, (req, res) => res.send('Hello from B!'));
함수나 함수 배열 또는 둘을 조합한 형태로 사용한다.
const cb0 = function (req, res, next) {
  console.log('CB0');
  next();
}

const cb1 = function (req, res, next) {
  console.log('CB1');
  next();
}

const cb2 = function (req, res) {
  res.send('Hello from C!');
}

app.get('/example/c', [cb0, cb1, cb2]);

app.get('/example/d', [cb0, cb1], (req, res, next) => {
  console.log('the response will be sent by the next function ...');
  next();
}, (req, res) => res.send('Hello from D!'));
3.4 Response method
| 메소드 | 설명 |
|---|---|
| res.download() | 다운로드될 파일을 전송한다. |
| res.end() | 응답 프로세스를 종료한다. |
| res.json() | JSON 응답을 전송한다. |
| res.jsonp() | JSONP 지원을 통해 JSON 응답을 전송한다. |
| res.redirect() | 요청 경로를 재지정한다. |
| res.render() | view template을 렌더링한다. |
| res.send() | 다양한 유형의 응답을 전송한다. |
| res.sendFile() | 파일을 옥텟 스트림(이메일이나 http에서 사용되는 content-type에서 application의 형식이 지정되어 있지 않은 경우에 octet-stream이라고 한다)의 형태로 전송한다. |
| res.sendStatus() | 응답 상태 코드(response status code)를 설정한 후 해당 코드를 문자열로 표현한 내용을 응답 본문으로서 전송한다. |
res.download(__dirname + '/public/report.pdf', 'report.pdf');

res.end();
res.status(404).end();

res.json(null);
res.json({ user: 'Lee' });
res.status(500).json({ error: 'message' });

res.jsonp({ user: 'Lee' });
res.status(500).jsonp({ error: 'message' });

res.redirect('/foo/bar');
res.redirect('http://example.com');
res.redirect(301, 'http://example.com');
res.redirect('../login');

// send the rendered view to the client
res.render('index');
// if a callback is specified, the rendered HTML string has to be sent explicitly
res.render('index', (err, html) => res.send(html));
// pass a local variable to the view
res.render('user', { name: 'Lee' }, (err, html) => {
  // ...
});

res.send(new Buffer('whoop'));
res.send({ some: 'json' });
res.send('<p>some html</p>');
res.status(404).send('Sorry, we cannot find that!');
res.status(500).send({ error: 'something blew up' });

res.sendFile(__dirname + 'test.json');

res.sendStatus(200); // equivalent to res.status(200).send('OK')
res.sendStatus(403); // equivalent to res.status(403).send('Forbidden')
res.sendStatus(404); // equivalent to res.status(404).send('Not Found')
res.sendStatus(500); // equivalent to res.status(500).send('Internal Server Error')
4. Middleware
미들웨어 함수는 요청 오브젝트(req), 응답 오브젝트(res) 그리고 애플리케이션의 request-response cycle 내에서 다음 미들웨어 함수 대한 액세스 권한을 갖는 함수이다.
미들웨어에는 유용한 동작을 하거나 요청이 실행되는 데 도움이 되는 무언가를 추가하는 패스스루(pass-through) 함수가 있다.
예를 들면 bodyParser()와 cookieParser()는 각각 HTTP 요청 페이로드(req.body)와 파싱된 쿠키 데이터(req.cookie)를 추가한다.
const express = require('express');

const bodyParser = require('body-parser');
const cookieParser = require('cookie-parser');

const app = express();

// parse application/json
app.use(bodyParser.json());
// parse application/x-www-form-urlencoded
app.use(bodyParser.urlencoded({ extended: false }));
app.use(cookieParser());
현재의 미들웨어 함수가 요청-응답 주기(request-response cycle)를 종료하지 않는 경우에는 next() 를 호출하여 그 다음 미들웨어 함수에 제어를 전달해야 한다. 그렇지 않으면 해당 요청은 정지된 채로 방치된다.
const express = require('express');
const app = express();

const myLogger = function (req, res, next) {
  responseText = 'Requested at: ' + req.requestTime + '';
  console.log('LOGGED: ' + responseText);
  next(); // Call the next middleware in the stack.
};

app.use(myLogger); // Execute myLogger.

// End the request-response cycle.
app.get('/', (req, res) => res.send('Hello World!'));

app.listen(3000);
5. 정적 파일의 제공
HTML, CSS, Javascript, 이미지 파일과 같은 정적 파일을 제공하기 위해 Express의 기본 제공 미들웨어 함수인 express.static을 사용한다. 정적 파일들이 저장되어 있는 디렉터리명을 express.static 함수에 전달하면 정적 파일 서비스를 사용할 수 있다.
아래는 public 디렉터리에 있는 정적 파일을 제공하는 예이다.
app.use(express.static('public'));
기존의 웹서버 상의 파일을 요청하는 것과 동일하게 정적 파일 서비스를 사용할 수 있다.
http://localhost:3000/index.html
http://localhost:3000/images/bg.png
6. Template engine
Express는 handlebars, pug, ejs와 같은 템플릿 엔진을 사용할 수 있다.
handlebars
$ npm install express-handlebars
...
const exphbs = require('express-handlebars');

// 템플릿은 views 디렉터리에 작성한다.(기본 설정)
app.engine('handlebars', exphbs({ defaultLayout: false }));
app.set('view engine', 'handlebars');

app.get('/', (req, res) => {
  res.render('home', { body: 'Hello world' })
});
<!-- views/home.handlebars -->
<!DOCTYPE html>
<html>
<head>
  <meta charset="utf-8">
  <title>Example App</title>
</head>
<body>
  {{{ body }}}
</body>
</html>
pug
$ npm install pug
// 템플리트 엔진 모듈을 로드할 필요가 없다.

// 템플릿은 views 디렉터리에 작성한다.
app.set('views', __dirname + '/views');
app.set('view engine', 'pug');

app.get('/', (req, res) => {
  res.render('home', { body: 'Hello world' })
});
ejs
$ npm install ejs
// 템플리트 엔진 모듈을 로드할 필요가 없다.

// 템플릿은 views 디렉터리에 작성한다.(기본 설정)
app.set('views', __dirname + '/views');
app.set('view engine', 'ejs');
app.engine('html', require('ejs').renderFile);

app.get('/', (req, res) => {
  res.render('home', { body: 'Hello world'})
});